Thursday, March 29, 2012

It's all in the cupcake.

I get these random urges to bake....so I do just that: bake.

This urge came to me about two months ago when I decided I wanted to make Chocolate Chip Cookie Dough Cupcakes. I saw the recipe and what it entailed, everything I enjoy; chocolate, chocolate chips, and chocolate chip cookie dough. How could I go wrong?

The only problem was, I had really never made such a fancy cupcake. The picture made it look like it was from "The Cup" or "Jilly's", you know the fancy cupcake places.


Look....


...not something I thought I could accomplish, but I was up for the challenge. 

By the way, I make this sound like I'm about to run a marathon. Pretty funny considering the word running is not really in my vocabulary.


The cupcakes required quite a few ingredients that I didn't already have at home. I realized upon reading the ingredients, that for the small cookies and the dough in the middle of the cupcakes, instead of making homemade cookies I just bought the Nestle pre-made cookie dough (yeah, that might be cheating, but it saved me a little time).

Chocolate Chip Cookie Dough Cupcakes
Cupcakes
1 (18.25 ounce) package devil's food cake mix
1 (5.9 ounce) package instant chocolate pudding mix
1 cup sour cream
1 cup vegetable oil
4 eggs
2 teaspoons pure vanilla extract
1 tablespoon instant espresso granules I did not use these, and it still tasted delicious
1/2 cup warm water


Frosting
3 sticks unsalted butter, softened
pinch of fine grain sea salt
1 tablespoon clear vanilla extract
2 pounds confectioners’ sugar, sifted
4-6 tablespoons heavy cream or milk


and don't forget....pre-made chocolate chip cookie dough (whatever is on sale).


How to make them:
For cupcakes...

1. Preheat oven to 350 degrees F. Line muffin tin with paper liners or spray with non-stick cooking spray.
2. In a large bowl, mix together the cake and pudding mixes, sour cream, oil, beaten eggs, and vanilla. In a small bowl, combine instant espresso granules and warm water, stirring until dissolved. Add espresso mixture to the cake batter and stir until fully incorporated.
3. Using a large cookie scoop, distribute the batter between 24 muffin wells; about 3 tablespoons of batter per well. Cover the bottom of the muffin cup; enough so that you can put the rolled cookie dough in each cupcake.
4. Measure .4 ounce balls of cookie dough (about 1 teaspoon) and drop a ball of dough into each cupcake. Be sure to use a spoon to completely cover the dough ball with batter.
5. Bake in preheated oven for 18-22 minutes or until a toothpick entered into the center of a cupcake comes out clean.
6. Remove cupcakes from muffin tins and allow to fully cool on a wire rack. Once cupcakes are cool, prepare your frosting.
Take the remaining cookie dough and make small cookies out of it, for the garnish on the cupcakes. Bake according to the package.
For frosting...
1. In a large mixing bowl, cream butter until fluffy. Slowly add in confectioner’s sugar, and continue creaming until well blended.
2. Add salt, vanilla, and 3 tablespoons of heavy cream or milk. Blend on low speed until moistened. Add an additional 1 to 3 tablespoons of heavy cream or milk until you reach the desired consistency. Beat at high speed until frosting is smooth and fluffy.
After the baking and mixing...
Once your cupcakes are cooled, put the frosting into a plastic bag, so you can pipe the frosting onto the cupcakes. If you have a pastry bag, it would probably work better, but I managed just fine with a plastic bag with a snipped off end on one corner.
Pipe the frosting onto each cupcake, and then roll the cupcakes in the mini chocolate chips. Once each cupcake is completely frosted and rolled in the mini chocolate chips, take the small cookies you made and place one on each cupcake.  
Putting the small cookies and mini chocolate chips make the cupcake, so you have to do that part.

Chris took quite a few of these to work, and I can say it's probably one of the few times I've had so many compliments not just how good they were, but how pretty my cupcakes were.
The frosting on these cupcakes is quite rich, my suggestion don't eat dinner skip right to dessert.
These cupcakes I will most definitely make again for some occasion. 

Can't really go wrong with chocolate, of any kind.


Wednesday, March 21, 2012

Pizza! Pizza!

Last night we decided we were going to make homemade pizza on the grill, unfortunately the grill portion didn't work out exactly how we had hoped so we opted for plan B: the oven. 


We like making homemade pizza, as it lets us put whatever we want on it. My husband and I like way different things on our pizza, so usually I cave to what he wants :), which will always be some sort of meat and cheese. I'm more into the "unique" pizzas and would prefer goat cheese and arugula, but it's easier to make one, so that's what we do. 


The great thing with homemade pizza, you can put whatever you want on it, so it usually works out pretty well.


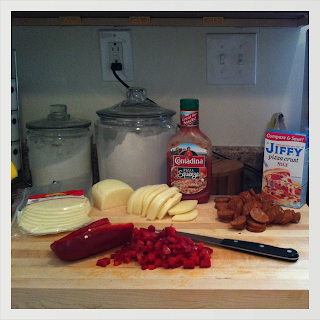
We decided to use quite a few ingredients we already had, only having to purchase three things to complete our pizza making. We already had chicken andouille sausage (from Trader Joe's, it's delicious), pizza crust, and pizza sauce. Cheese and a red pepper were purchased at our amazing local market we share an alley with, Vincent's.  Usually non-shredded cheese makes the pizza taste better, so we always buy the big ball of mozzarella cheese and the slices of provolone. 


chopped and ready to go....


Vincent's is a family-owned market that one of my husband's friend's family owns, it's really convenient for us considering we share an alley with them. It is so nice to have a market like that for any last minute things we may need for dinner; it is especially nice when we are hungover and can scoot on over there for a soda and unhealthy snacks. 


Anyways, back to the pizza... 


Preheat the oven to 425 degrees. 
After chopping all the ingredients, I prepare the pizza crust. I always utilize a mix, it's a lot easier than making everything homemade. I've used quite a few different pizzas crusts including Betty Crocker and the Boloba (the crust that comes full-size already), but I really like the Jiffy pizza crust. When it's on sale it's about $1.50, so I usually buy two. It only requires hot water and the mix, and you've got pizza dough. 


bowl, mix, and 1/2 cup of hot, tap water.

Once the pizza dough is ready, make sure to use flour to flatten it out; otherwise the pizza dough will get stuck to your fingers. I learned this the hard way, and have had to buy new pizza crust mix because it got so stuck to my fingers that the crust was only enough for one person. Since then, I use flour to get the dough out of the bowl.  

Flatten the dough out into the shape you want it; I usually cannot get it into a perfect circle, but that's what makes it homemade. We usually put it on tin foil (if you put it on tin foil put some oil down before flattening out the dough on it) and then on a pan to put in the oven, but that is not necessary. 

After the dough is spread to the size you want, drizzle a little bit of extra virgin olive oil on the dough and then spread the pizza sauce all over it. A thin to medium layer of the sauce is really all you need, unless you like more sauce. 


                    Extra Virgin Olive Oil.


             sauced.

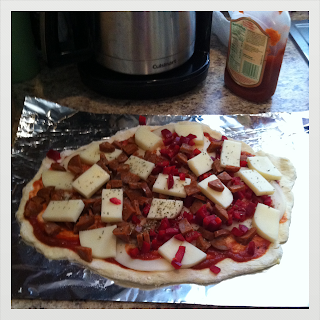
Once you have put the amount of sauce you want and spread it out, it's time for you to put all the toppings on. I always start with the large slices of provolone, put the sausage on top of that, and then place the smaller slices of mozzarella in places that I think need more cheese.  I always put a little more sauce on top of the provolone slices and then sprinkle the red peppers all over the pizza (in this case 1/2 of the pizza). 

pizza before placed in the oven.
(lots of meat)


Cook the pizza for about 15-20 minutes; I would say watch it pretty carefully and take it out when you are happy with the brownness of your cheese.  We usually cook ours about 17 minutes or so. 

And then enjoy...
yum-yum

This is how we always make our pizza, with the chicken andouille sausage, cheese, and peppers, but again any variation of ingredients will give you the same result.

Makes you feel like you are a professional pizza maker with not a whole of effort.

The people you are sharing it with will sound like that Little Caesar's guy; "Pizza! Pizza!"


Monday, March 19, 2012

Best Mac 'N Cheese? Not entirely.

I've always wanted to try making homemade macaroni and cheese. My husband had tried quite a few years ago to make some, when we were still dating. It was probably a way to try to impress me, alas, it didn't turn out very well (not terrible, but not great) and way too many breadcrumbs were used. 4 years later, it was time to try again. 

I looked for a recipe and found quite a few to choose from. The recipe I found called for Colby Jack and Cheddar cheeses; I like both, so I tried it.  

It wasn't quite as easy as the recipe had me believing, and there will be many things I will change if I were to make it again.


Macaroni and cheese should look something like this...


Mine looked like this...


...not at all what the picture had me believing. 


Maybe I should've just stuck to the baking??


Here's the recipe.


Baked Macaroni and Cheese
Ingredients:
1 lb macaroni (elbow, shells, whatever your preference)
6 Tbsp unsalted butter
1 medium garlic clove, minced
1 teaspoon dry mustard
1/4 teaspoon cayenne pepper
6 tablespoons all-purpose flour
2 1/4 cups low-sodium chicken broth
3 1/2 cups milk
4 cups colby cheese, shredded
2 cups cheddar cheese, shredded
salt and pepper to taste
toasted bread crumb topping*

Bring a pot of water to boil over high heat.  
Add 1 tablespoon of salt and macaroni and cook until just beginning to soften, about 5 minutes.  
Drain the pasta in a colander and set aside.

Wipe the pot dry, add the butter and set over medium heat until melted.  
Stir in the garlic, mustard and cayenne and cook for about 30 seconds.   
Stir in the flour and cook, stirring constantly, until golden, about 1 minute.  
Slowly whisk in the milk and chicken broth.  
                  this is where it went drastically wrong.....
Bring to a simmer and cook, stirring often until bubbling and thick, about 15 minutes.  
Off heat, add the cheeses and stir until melted.   Add salt and pepper to taste.

Stir in the pasta, breaking up any clumps.  Pour into a baking dish and sprinkle with crumb topping.


*For the crumb topping, any variation of breadcrumbs and melted butter tossed together.   
You could add some shredded cheese to this or  fresh chopped parsley or chives.   
But the ratio is typically about 1/4 cup breadcrumbs to 1 tablespoon melted butter.  


Bake it for close to 40 minutes. 


I think what happened, is I wasn't patient enough and I may have needed to shred my own cheese.  It didn't taste that bad, but it definitely wasn't the best thing I have ever made.


Next time, patience, it's a virtue. 

Sunday, March 18, 2012

And here we go....Pi Day 2012

As I said, I am a teacher. I teach high school English at a rather large public school south of the city of St. Louis. Many of my really close friends are math teachers and we are a collective group of uber nerds. 


Trust me when I say this; we may come across as the "cool" kids, but fear not we are nerdy.


We celebrate quite strange holidays, one of those being Pi Day. 
Pi Day occurs every March 14; 3.14 and math teachers (and wanna be math teachers--because I am by no means a math teacher; ask my students, I can barely add) take this as a day to eat a lot of circular items and celebrate the magical number of 3.1415926...


This year one of my teacher friends, who teaches at a charter school in the city, told me that her school was having a contest amongst the teachers of who could make the best pie. The students would then vote and the best pie would win first place. Obviously, I asked her what type of pie she was going to make and she simply said, "Oh, I'm buying mine." I'm not going to lie when I say I made a disgusted face and told her that I would make a pie for her. 


So I decided to make Red Velvet Whoopie Pies. I found this great recipe probably about two months ago and was just waiting for a time to make them. I was pretty excited to finally have the occasion. 


Plus, I'm really competitive so any opportunity to win something, I jump at.


(I had hoped they'd turn out as pretty as this.)


Red Velvet Whoopie Pies
           
Ingredients:
Whoopie Pies
2 cups all-purpose flour
2 Tbsp. unsweetened cocoa powder
1/2 tsp. baking soda
1/4 tsp. salt
1/2 cup butter, softened
1 cup packed brown sugar
1 egg
1 tsp. vanilla
1/2 cup buttermilk
1 1-oz. bottle red food coloring (2 Tbsp.)


Cream Cheese Filling (you could use the typical Marshmallow filling, but I liked the way the cream cheese filling tasted)
4 ounces cream cheese, softened
4 tablespoons (½ stick) butter, softened
2 cups (8 ounces) powdered sugar
½ teaspoon vanilla
splash of milk if needed


Follow these easy steps...


1. Preheat oven to 375 degrees F. Line baking sheets with parchment; set aside. 


2. In medium bowl combine flour, cocoa powder, baking soda, and salt; set aside.

3. In large mixing bowl beat butter on medium to high 30 seconds. Beat in brown sugar until light and fluffy. Beat in egg and vanilla. Alternately add flour mixture and buttermilk, beating after each addition just until combined. Stir in food coloring.

3. Spoon batter in 1- or 2-inch diameter rounds, about 1/2-inch high on prepared baking sheets, allowing 1 inch between each round. I used a cookie scoop so the tops and bottoms were the same size.

4. Bake 7 to 9 minutes for 1-inch cookies or 9 to 11 minutes for 2-inch cookies, or until tops are set. Cool completely on baking sheets on rack. Remove cooled cookies from baking sheets.

5. To fill, dollop  Cream cheese frosting on flat sides of half the cookies. Top with remaining cookies, flat sides down. It was supposed to make 60 one-inch cookies, but I was only able to make 20 one-inch cookies; I probably could have made them smaller, but I liked the size they ended up being. 

6. To store: Refrigerate in airtight container up to 4 days. Let stand at room temperature 15 minutes before serving.


My finished product...


I have to say, they turned out pretty yummy. 


My husband wanted to eat them all, but I only allowed him two and kept a close watch on him every time he went into the kitchen the remainder of the night.  


Unfortunately, I lost to an ice cream cake/pie. 
I think it was rigged. 


First blog...ever

I decided today while I was over at my in-laws, that I wanted to start a food blog.


Here goes nothing.....


This is my husband and I at one of our three receptions we had last summer for our wedding.  


I've found in my first year of marriage that maybe I should fit into the "Susie Homemaker" role. I'm only kind of good at this. I'm good at the cooking/baking part of the homemaker wife; the cleaning portion, not so much. 


With this, I came upon the website Pinterest
Pinterest was introduced to me by a dear friend, who suggested I sign up for it. She warned me of the addictive state it may put me in and she was right.


I have found myself pinning random things that I will probably never use or need, but desire and think about all the time. In perusing Pinterest I found so many recipes that I've made and even more that I am going to make.


My ultimate dream (which would never happen) would be for me to quit my full-time teaching job and become a full-time food blogger. How great would that be? I feel like I could be pretty darn good at it and could fulfill this new found idea of mine. 


It's a pipe-dream that would never happen, but a girl can dream. 


I will be posting as I bake/cook. I have quite a few things to post on here as I have been quite busy being a little baker in my first year of marriage. I'd say my husband is quite happy with my new found love for baking and cooking (especially the baking).


Hopefully this isn't one of those things I say I'm going to start, and post once and never post again. Maybe I will entertain a few of you folks out there with my food blog, that no other blog has ever done for you. Blowing your mind, will be my ultimate goal! 


I think I might be setting my hopes a little high, but we will see...