Monday, April 16, 2012

Recipe Sharing: my favorite kind of sharing

I really like when people give me recipes to try, especially when they are really easy and pretty no fuss.

I am lucky enough to have my classroom by the FACS (Family and Consumer Education) classes, which means when they cook I get to sample. Through the years of my teaching, I've been a part of a chili cook-off, eaten cinnamon rolls and death by chocolate cake. They are very kind to me, especially when I need that mid-morning snack.

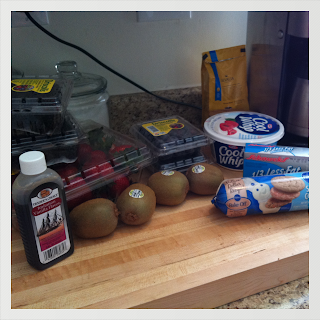
One of our new FACS teachers is on Pinterest, and has found quite a few new recipes that she's included in her curriculum. One of these being, Fruit Pizza.

I've heard of Fruit Pizza before, but have never honestly had it nor tried to make it. I have done Veggie Pizza, which is incredibly easy so I thought I'd give the fruit version a try.

You can probably put any type of fruit you want on this, from kiwi to strawberries or blueberries, there are quite a few types of fruit to choose from that would go excellent on this "pizza."

There are very few ingredients, which also makes this recipe no fuss and really easy to whip up after work (which is exactly what I did today).

Fruit Pizza


Ingredients:


1 roll of refrigerated sugar cookie dough 
1 package (8 oz.) cream cheese (I used the 1/3 fat version---trying to healthy this up a bit)
1 cup whipped topping (I, again, utilized the "lite" version of Cool Whip)
4 T. plus 4 tsp. sugar
1 teaspoon vanilla extract
fruit of your choice: 
Strawberries 
Blueberries
Blackberries
Kiwi


Directions:


1. Preheat oven to 325 degrees (according to the package).


2. Roll out sugar cookie dough onto an 8 x 11 pan.
Bake according to package; 10-12 minutes.


3. In a small bowl, beat cream cheese, sugar,
and vanilla extract until smooth...
4. Cut up fruit into small slices.

5. Spread "sauce" onto cooled cookie

...smooth "sauce" to have peeks


Finished Product: arrange fruit on the pizza in
any way you want.


The pizza turned out well.
I look forward to sharing it with my husband this evening, hopefully he enjoys it as much as I did when my coworker let me taste it.

Share on.


Tuesday, April 10, 2012

Lemonhead

I could say that I hate candy, but that would be an outright lie, so let me say this "My name is Jenny and I think I'm addicted to candy and anything made of sugar." I guess I should call myself a "sugar addict."

Now that that's on the table let's talk about some delicious lemon cupcakes I made about a month ago.

I had a trivia night to go to with friends and everyone said they were going to bring one thing or another, and I decided I was going to bake. I know, shocker. I found a great recipe for lemon cupcakes on Pinterest (as I do with most things) and not only did I want to make them, but wanted to make them in the mini version.  Only problem, no mini-cupcake pan(s).

After I begged and pleaded--more like just asked nicely--with some coworkers; one very nice coworker let me borrow her mini cupcake pans. I was in business.

I have to say I think I like mini cupcakes a lot more than the normal size, mainly because I can eat quite a few and think I'm eating less. This in no way is the truth, but I like to convince myself of things like this; now I'm convincing you of it as well.

Lemon Cupcakes came from a website called "Your Cup of Cake." I have to say, I want to make just about everything on this website; it all looks delicious and quite manageable.

They are to look like this....mine didn't quite look as pictured here, but I thought that they looked even better. I'm OK, this time, with my cupcakes not looking exactly like the picture.
Most times, though, I am not OK with it and beat myself up about the look of my not-so-professional looking cupcakes.

The ingredients, for the most part, were things I had at home; even though I changed a couple things.

Ingredients:

Lemon Cupcakes:
1 box lemon cake mix
1 cup sour cream
¼ cup fresh lemon juice
½ cup milk
¾ cup oil
4 eggs
Zest of 1 lemon --did not use the zest of a lemon, instead I squeezed an additional 2 lemons into the cake batter.
1 small box lemon instant pudding mix

Cream Cheese Frosting:
8 oz cream cheese
½ cup butter
¼ cup sour cream
3 ½ cups sugar
1 tablespoon honey (optional) --used this and didn't add anything to the frosting, so omitting it isn't a big deal.
1 teaspoon vanilla extract


What to do:
Directions:
1. In a large bowl, mix sour cream, lemon juice, milk and oil together.  Add eggs one at a time until fully incorporated.

2. Preheat oven to 350 degrees and line muffins tins with 24 regular or 60 mini cupcake liners.

      3. Add zest, cake mix, and pudding mix slowly while stirring.
4. Fill cupcake liners 2/3 full and bake for 12 (minis)-18 (regulars) minutes or until an inserted knife comes out clean.         

5. Frosting: Beat cream cheese and butter until light and fluffy.  Add powdered sugar slowly.  Add sour cream, honey and vanilla and beat well. Add more powdered sugar if needed for desired taste or consistency.

6. Pipe onto cooled cupcakes.  
my finished product.
As you can see my frosting wasn't so fluffy, but I liked the way it looked and tasted. I also decided to use Lemonheads instead of lemon zest for decoration. 

My husband really likes Lemonheads and honestly, who doesn't like sour candy? Normally when I by candy it's Sour Patch Kids or Chewy Spree; anything sour, has a place in our home.

They were a hit at the trivia night, so much so, that I took the leftovers to school and shared them with my advisory kids; they, too, loved them. 

Lemonheads, candy, sugar = my addiction (and quite possibly everyone I surround myself with).


Tuesday, April 3, 2012

Best Teacher Ever? I think so.

Tomorrow is our last day of school before "spring break." In the five years I've been teaching at the school where I am, I've yet to understand why we have such a short spring break. Oh well, a few days off of school will be so nice to get caught up on grading, getting ready for state testing (a mental state I am yet to be in), and preparing for Prom next weekend.

With the break coming up and me making my kids review for the next week for standardized testing, I deciding I'd be nice and do some baking for them. I mean it's not like I really mind, considering I do love to bake.

A few years back I tried out this recipe, by taking the ordinary chocolate chip cookie dough and instead of making cookies with it I made bars. They were a huge hit, so I've made them a few times since and that it what my students should enjoy...or else. It's easy to make a lot of the bars at once, and they are delicious; a chocolate chip cookie in a bar format-can't really go wrong.

I obviously had to use my KitchenAid mixer. Let me tell you, it is possibly one of the best presents I have ever received...wedding gifts are magical, especially because you get to register for things that you'd never buy yourself, this being one of those. Look at how pretty it is...

I use this thing any chance I get, it is so versatile that I can literally use it for most anything.

I regress...chocolate chip cookie bars.

The typical ingredients for chocolate chip cookies are what you need for these bars; I do not like nuts in my bars/brownies, so I never put those in this, but if you are a nut lover (no pun intended) add them on in.
I quadrupled my recipe, because I needed to make approximately 180 bars, but obviously you only need one of everything listed on the back of the Nestle package. 

No secret here, I use that recipe; it's a classic, how can you not?
Nestle Tollhouse (said like Phoebe on "Friends")

Making the bars goes in the same order as the chocolate chip cookies, once the dough is made is where things change a bit. 

mix, mix, mix
I use the whole bag of chocolate chips.
You probably could measure it out.

Once the dough is made, spread it out on a 11x18" pan (I think that's the size; it's the biggest shallow brownie pan). Spread the dough in a thin layer, anything thicker than 1/2 inch will make the bars very doughy and thick. I usually even spread them thinner than a 1/2 inch so the bars are relatively "normal" sized once baked.
Cook them for about 9-11 minutes, until golden brown on the top. Take them out and let them cool before cutting into them. Once the pan is cooled, cut the bars into small squares or big ones depending on who you are making them for. I would also suggest taking a knife and go around the edges so they are easier to take out of the pan once completely cooled.

These are more delicious, I think, than the actual chocolate chip cookies. I guess I'm probably biased. 

We will see what the verdict is tomorrow, when I surprise my students with these. If they enjoy them, maybe I will bake for them more. 

Teacher of the year, I see it now. Although it would probably be skewed since I bribed them with sweets to vote for me.